
Copper takes on a wonderful patina after time, turning its shiny metallic finish into an aged rough surface with years of depth and a plethora of green hues. Learn to create a faux finish verdigris effect and suddenly inexpensive everyday items are transformed into valuable heirlooms, or at least they look like heirlooms.
Steps to painting a verigris faux finish
Verdigris Faux Finish Preparation
Before beginning the verdigris faux finishing process every item will need a little preparation.
- Cleaning – The item that will receive a verdigris faux finish needs to be cleaned thoroughly to remove any dirt or grease build up. If the object is metal a light sanding with a fine sandpaper may help paint adhere.
- Primer – A primer isn’t always necessary but it may be if the original item is too dark or a surface that is difficult for paint to adhere to. If the object is plastic then a primer designed for plastic is necessary. Use personal discretion to determine if a primer is called for.
Painting a Verdigris Finish
 The painting part is the longest and most difficult part of the verdigris process. The good news is that it doesn’t require a skilled painter, in fact the worse the paint job the better. Remember to let the paint dry thoroughly between every application.
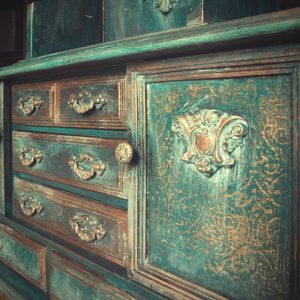
- Base Coat – The base coat, not including any primers used, is needs to be a metallic paint. If the look attempted is meant to be an authentic verdigris then a copper metallic paint should be used. Cover the entire item in the paint, but don’t worry about getting a perfect finish.
- Dark Green – The next coat of paint in the verdigris decorative painting process is a dark green coat which doesn’t cover all of the metallic paint, in fact it’s applied with a sponge so make sure to leave spots where the metallic finish shows through.
- Lighter Greens – The same green paint can be used by adding white to lighten it. Apply the lighter shade(s) in the same manner as the dark green was applied, in blobs and haphazardly. Keep diluting the green with the white paint and adding additional coats until the finish reaches the desired level, with some of the metallic bronze and dark green still peeking through.
Finishing Touches on a Verdigris Project
 The verdigris faux finish is almost done now and probably looks incredible but by completing the final two steps the project will become even more durable and authentic looking.
- Blue Coat – To add the final, finishing touch, water down a light blue-grey latex paint and dab it onto the surface or brush on a thin watery layer evenly and then dab it off gently with a soft paper towel or white rag before it gets a chance to dry.
- Clear Finish – Finally, after the entire piece has had a chance to thoroughly dry and cure it’s time to apply at least two coats of a clear polyurethane acrylic to give it a glossy finish and to protect the verdigris paint job.
Creating a verdigris faux finish is actually a very easy task, it just requires a lot of time waiting for paint to dry. But for anyone with some free time, a little creative skill and a vision almost anything can be given a verdigris finish.
The post How to Create a Verdigris Faux Finish appeared first on All around the house.
from All around the house http://allaroundthe.house/verdigris-faux-finish/
via IFTTT
Comments
Post a Comment