
Many houses have 8 to 10 feet of land on one side or the other between the house and the property line. Garden homes or town homes often have a narrow, fenced plot of ground in the front or back. These areas can be challenging to landscape because the space has awkward proportions, and sunlight may be scarce if there are adjoining houses. Proper planning and experimentation with different plants and gardening techniques can create stunning gardens in these often under-utilized areas.
Narrow Space Landscaping Ideas
![]() Espalier a Tree or Shrub
Espalier a Tree or Shrub
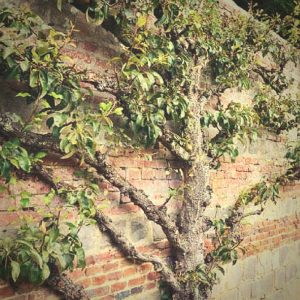 Espalier a Tree or Shrub
This space-saving method of training a tree or shrub to grow flat against a wall or fence adds a classic, old-world touch to a small garden without using up valuable ground space. Espalier designs may be casual and free flowing or structured and formal according to taste. Slow-growing plants such as sasanqua camellia keep pruning to a minimum and make ideal plants for espalier. Fruit trees are popular choices for this technique, but they require a considerable time commitment. Boston or English ivy, climbing roses and wisteria are also suitable for espalier and may be easier to manage than a shrub or tree. Once the plant is established in its pattern, only routine pruning is necessary to remove stray stems or branches.
![]() Plant Columnar Trees
Plant Columnar Trees
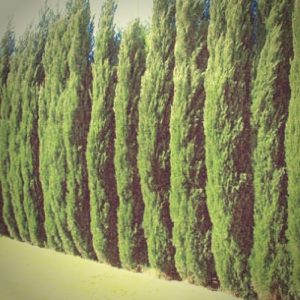 Plant Columnar Trees
Columnar trees are tall and narrow. They do not spread the way other trees do. For this reason, they are useful in small spaces. There are a number of choices available in deciduous and evergreen varieties. Deciduous varieties such as columnar hornbeam, Dawyck purple beech and columnar oak have dense winter habits. Evergreens such as incense cedar, Italian cypress, Hoops blue spruce and columnar Scotch pine provide year round foliage. A row of columnar threes looks spectacular against a wall or when used as a privacy screen.
![]() Plant Low-maintenance Perennials
Plant Low-maintenance Perennials
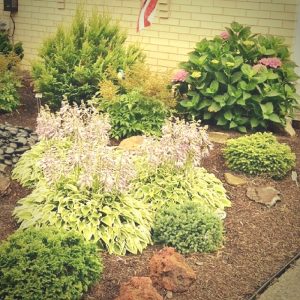 Plant Low-maintenance Perennials
Once larger elements of the garden are established, add perennial and annual plants. Choose hardy plants that are tolerant of varying light conditions and that do not require excessive watering. Aspidistra, the cast iron plant, and Liriope muscari are two such plants. Both come in green and variegated varieties and add interesting color and texture to a garden. They are not fussy about light or water and grow well in most USDA planting zones. Both are useful as foundation plants or borders.
Small evergreen shrubs such as dwarf azalea, arborvitae and English boxwood are excellent additions to a diminutive garden. They are easy to grow and can be kept small with minimal pruning. Use them as foundation plantings or borders.
Consider ground cover plants such as ajuga, which comes in several attractive variegated types, or one of the creeping junipers to add a low, textural element to beds.
![]() Add Accessories
Add Accessories
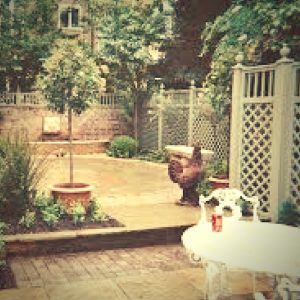 Add Accessories
The addition of a garden seat, an arbor, an attractive old gate or a small water feature can create an appealing vignette in a narrow space. An informal path of stepping-stones is both useful and decorative, especially when it leads the way to a scenic, albeit small, setting. A vintage bench beside a splashing fountain creates a restful ambiance and provides a place to enjoy a cooling drink and a moment of contemplation. Birdbaths, birdhouses and small statuary are appropriate for small gardens.
Consider it a Challenge
Narrow gardens can become very special places. Think of New Orleans’ famous alleys and courtyards, many of which are nothing more than tiny slivers of land wedged between buildings with little room for planting. Undaunted, French Quarter gardeners pack climbing vines, foliage plants and flowers into every nook and cranny. The result is calculated, horticultural chaos, but no one would ever think of these delightful retreats as anything less than charming.
The post 4 Tips to Landscape a Narrow Space appeared first on All around the house.
from All around the house http://allaroundthe.house/narrow-space-landscaping/
via IFTTT
Comments
Post a Comment